whatsapp

drshraddha@restore-you.in

Book an appointment today

Why Choose Us?

Trusted Clinic and Trusted Care

Trusted Clinic

Your health, our trusted care.

Personalized Care by our Expert Therapist

Expert Therapist

Receive personalized care and healing from our expert therapists.

Quality Treatment at Affordable Prices

Affordable Prices

We offer quality treatment at affordable prices.

Home visit by Expert Assistance

Home Visit

We offer home visit by providing expert assistance tailored to meet your unique needs.

Winner

0

Years Of Experience


Cases

0

Solved Cases


Happiness

0

Happy Patients

We have 17+ years of practice.

Dr. Shraddha Khot

About Doctor

Dr. Shraddha Khot (BPTh, KEM hospital)

Dr Shraddha Khot has a total 17+ years of experience in the field of physiotherapy and has many turnaround success stories. She is known for treating challenging cases and has excellent success rate.
Dr Shraddha Khot has completed bachelor's of physiotherapy from the esteemed Seth GS medical college & K.E.M hospital, Mumbai and is registered with Maharashtra association of OT/PT council. She was awarded as a Runner up of "Alka Memorial Award" at Indian Association of Physiotherapy conference.
She is highly experienced in exceptional assessment, diagnosis, counselling and treatment of orthopedic, post-surgical, sports physiotherapy, neurological, lifestyle related conditions. She expertise in practicing Manual Therapy and Mobilization techniques for better results. With her expert treatment, patients walk out pain free & stress free at the end of the program, who were otherwise advised surgery as the only treatment option for their condition.
The unique concept at RESTORE clinic is that patients are given a customized program of exercises, designed specific to their conditions. At RESTORE we always emphasize on the core physiotherapy exercises as to resolve the problem right from the root.


Circle

Reviews On Various Platforms

Common Condition Treated

Explore our range of expert services designed to support your health, wellness, and recovery.

Low Back Pain
Low Back Pain
Connect
Neck Pain
Neck Pain
Frozen Shoulder
Frozen Shoulder
Knee Pain
Knee Pain
therapy
Orthopaedic Physiotherapy
therapy
Sports Physiotherapy
sports therapy
Post-Surgery
Sport
Neurology
Message
Women's Health
Common Conditions Treated by Restore You

We Proudly Give Quality Treatments

circle
Image

Testimonials

What our Patients Say About us:

Articles

Latest News & Articles from
the Blog Posts

Common Posture Mistakes and How to Fix Them for Better Health

Common Posture Mistakes and How to Fix Them for Better Health

Introduction: Why Posture Matters More Than You Think

In our modern world of long work hours, screen time, and sedentary lifestyles, posture often takes a back seat. However, poor posture can lead to a range of health problems, including chronic back pain, neck stiffness, and even digestive issues. The good news is that many posture mistakes are easy to fix with a little awareness and some simple adjustments.

In this blog post, we’ll highlight the most common posture mistakes and provide you with actionable tips to correct them. With these fixes, you can improve your posture and prevent long-term discomfort.

1. Slouching While Sitting

The Mistake:

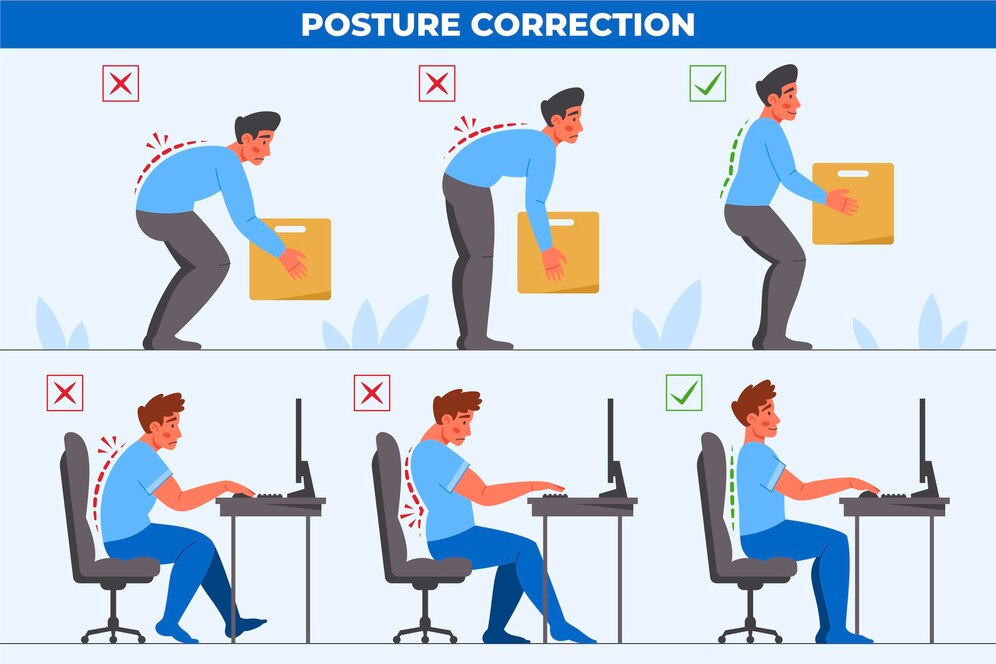
Slouching or leaning forward in your chair is one of the most common posture errors. This happens when the spine loses its natural curve and puts unnecessary strain on the muscles and joints. Long-term slouching can cause chronic back pain, fatigue, and even spinal misalignment.

How to Fix It:

  1. Sit Back in Your Chair: When seated, ensure your back is fully supported by the backrest. Your lower back should be supported by the lumbar curve of your chair.
  2. Engage Your Core: Actively tighten your core muscles to keep your spine in a neutral position. Avoid letting your stomach or lower back sink forward.
  3. Feet Flat on the Floor: Keep your feet flat on the floor, knees at a 90-degree angle, and avoid crossing your legs for better alignment.

2. Hunching Over While Standing

The Mistake:

When standing, many people tend to round their shoulders forward or jut their head out, which puts a strain on the neck and upper back. This forward-leaning posture, often referred to as "text neck" or "tech neck," is a common issue in the digital age.

How to Fix It:

  1. Align Your Ears with Your Shoulders: When standing, make sure your head is aligned with your spine. Imagine a straight line from your ears to your shoulders to avoid leaning your head forward.
  2. Relax Your Shoulders: Roll your shoulders back and down to prevent them from hunching forward. This will open up your chest and improve your posture.
  3. Engage Your Core: Tighten your abdominal muscles to help support your lower back and prevent slouching.

3. Text Neck (Looking Down at Your Phone or Screen)

The Mistake:

Spending hours looking down at your phone, tablet, or laptop can create "text neck"—a condition where the head juts forward, causing strain on the neck and upper back. This forward posture increases the load on your spine, leading to discomfort and potential long-term damage.

How to Fix It:

  1. Raise Your Device: Hold your phone or tablet at eye level to keep your head and neck in a neutral position. This helps you avoid looking down and straining your neck.
  2. Take Breaks: Limit the time spent on devices and take frequent breaks to stand, stretch, and realign your posture.
  3. Strengthen Your Neck Muscles: Perform neck stretches and exercises to strengthen the muscles that support your neck and improve posture.

4. Standing with Weight on One Leg

The Mistake:

When standing for long periods, many people shift their weight onto one leg, causing an imbalance in the body. This uneven distribution of weight can lead to lower back pain, hip issues, and muscle fatigue.

How to Fix It:

  1. Distribute Your Weight Evenly: Try to keep your weight evenly distributed between both feet, whether you’re standing still or walking.
  2. Engage Your Core: Gently tighten your abdominal muscles to provide better support for your spine.
  3. Avoid Locking Your Knees: Keep your knees slightly bent, as locking them can cause tension in your legs and lower back.

5. Overarching the Lower Back

The Mistake:

Many people tend to push their hips forward, causing the lower back to arch excessively. This can lead to compression in the spine, lower back pain, and even issues with the pelvic muscles.

How to Fix It:

  1. Maintain a Neutral Spine: Keep your pelvis neutral. Avoid sticking your hips forward, and instead, engage your core muscles to support the lower back.
  2. Mind Your Posture When Standing: When standing, imagine your pelvis is in line with your rib cage to avoid excessive arching in the lower back.
  3. Strengthen Your Core and Glutes: A strong core and glutes will help prevent your lower back from overextending.

6. Improper Sleeping Posture

The Mistake:

Sleeping in a poor position—such as on your stomach or with an unsupported neck—can lead to neck pain, back issues, and poor sleep quality. This is often overlooked as a contributor to poor posture.

How to Fix It:

  1. Sleep on Your Side or Back: These positions maintain the natural alignment of your spine. If you sleep on your back, consider placing a pillow under your knees for added support.
  2. Choose the Right Pillow: Ensure that your pillow supports your neck in a neutral position. Avoid high or stiff pillows that can cause your neck to bend unnaturally.
  3. Use a Mattress that Supports Proper Alignment: A medium-firm mattress that supports the spine’s natural curvature will reduce pressure points and promote better posture during sleep.

7. Forward Head Posture (FHP)

The Mistake:

Forward head posture occurs when the head juts forward of the shoulders, often as a result of hours spent staring at a screen. This posture puts excess pressure on the cervical spine and can lead to tension headaches, neck pain, and even shoulder discomfort.

How to Fix It:

  1. Chin Tucks: Perform simple exercises like chin tucks, where you gently pull your chin back toward your neck to strengthen the muscles that help correct forward head posture.
  2. Align Your Ears with Your Shoulders: Focus on keeping your head aligned with your spine by drawing your ears back, rather than letting your head protrude forward.
  3. Take Frequent Breaks: If you're working on a computer or phone for extended periods, take breaks to readjust your posture and stretch your neck muscles.

Conclusion: The Importance of Correcting Posture Mistakes

Correcting posture mistakes is essential for preventing pain, improving mobility, and maintaining overall health. By being mindful of your posture and making small adjustments throughout the day, you can avoid the discomfort and long-term consequences that come with poor alignment.

Remember, improving your posture won’t happen overnight, but with consistent effort, you’ll notice the difference in how you feel. So, whether you’re sitting at your desk, standing in line, or simply relaxing at home, pay attention to your posture and make adjustments where needed.

Read More
Effective Physiotherapy for ACL Tear Recovery: A Comprehensive Guide

Effective Physiotherapy for ACL Tear Recovery: A Comprehensive Guide

The anterior cruciate ligament (ACL) is one of the key ligaments in the knee, providing stability during movement. An ACL tear is a common and often serious injury, especially for athletes and individuals who engage in sports with sudden stops, jumps, or changes in direction. Surgery is sometimes necessary, but in many cases, physiotherapy plays a crucial role in ACL tear recovery. In this blog, we'll explore the importance of physiotherapy for ACL tear rehabilitation, the process, and how it can help you regain full function of your knee.

What is an ACL Tear?

The ACL is located inside the knee and connects the femur (thigh bone) to the tibia (shin bone). A tear in the ACL can be caused by:

  1. Sudden changes in direction
  2. Twisting or hyperextension of the knee
  3. Direct impact during sports activities
  4. Overuse or strain in certain movements

An ACL tear can range from a partial tear to a complete rupture. In severe cases, surgery may be required to reconstruct the ligament. However, in cases where surgery is not immediately necessary or preferred, physiotherapy plays a pivotal role in strengthening the knee and restoring function.

Why Physiotherapy is Key for ACL Tear Recovery

Physiotherapy helps patients who have torn their ACL to regain strength, flexibility, and mobility in their knee joint, ultimately speeding up the recovery process. Here are some of the key benefits:

  1. Pain Reduction and Swelling Management:
  2. A physiotherapist can provide techniques such as ice therapy, elevation, and compression to reduce swelling and alleviate pain.
  3. Soft tissue mobilization, ultrasound therapy, or electrical stimulation may also be employed to manage pain and improve circulation to the affected area.
  4. Restoring Range of Motion:
  5. After an ACL injury, the knee may become stiff and lose range of motion. Physiotherapy techniques help restore normal movement patterns, ensuring the knee joint moves as it should.
  6. Strengthening the Muscles Around the Knee:
  7. Strengthening exercises for the quadriceps, hamstrings, and calf muscles help provide stability to the knee joint. A strong musculature around the knee helps reduce the risk of future injuries.
  8. Improving Proprioception and Balance:
  9. Proprioception refers to the body's ability to sense its position in space. It’s vital for preventing falls and maintaining joint stability. Physiotherapists will use balance training exercises to improve proprioception and reduce the risk of further injury.
  10. Preventing Future Injuries:
  11. Once you’ve recovered from an ACL tear, physiotherapy continues to play a role in strengthening the knee and improving overall joint health. A comprehensive rehabilitation program can help ensure that the knee is more resilient to future strains.

The Phases of Physiotherapy for ACL Tear Recovery

Phase 1: Acute Phase (0-2 weeks post-injury)

The initial phase focuses on reducing swelling, managing pain, and preventing stiffness in the knee joint. Early interventions may include:

  1. Ice therapy
  2. Compression and elevation
  3. Gentle range-of-motion exercises

Phase 2: Recovery Phase (2-6 weeks post-injury)

During this phase, the primary goal is to restore mobility, improve strength, and start regaining functional movement. Exercises may include:

  1. Quadriceps and hamstring strengthening exercises
  2. Partial weight-bearing activities (if recommended by the physician)
  3. Gentle stretching to enhance flexibility

Phase 3: Strengthening Phase (6-12 weeks post-injury)

In this phase, the focus shifts to building strength in the muscles around the knee and improving functional movement patterns. This includes:

  1. Progressive strengthening exercises
  2. Closed-chain exercises (e.g., squats, leg presses)
  3. Balance and proprioception training

Phase 4: Return to Sport Phase (3-6 months post-injury)

Once the knee is stable and strong, the next goal is to return to full function. The physiotherapist will guide you through sport-specific drills and movements to ensure you can return to your activity safely. During this phase:

  1. Plyometric exercises (e.g., jump training)
  2. Agility drills
  3. Dynamic balance training

Phase 5: Maintenance and Prevention (Ongoing)

After the rehabilitation process, ongoing physiotherapy can help maintain strength, flexibility, and joint stability to prevent future ACL injuries. This may include:

  1. Regular strength training
  2. Continued proprioception exercises
  3. Proper warm-up and cool-down techniques

Key Exercises for ACL Tear Rehabilitation

1. Quadriceps Sets:

  1. Sit on the floor with your leg extended.
  2. Tighten your thigh muscle and hold for 5-10 seconds.
  3. Repeat 10-15 times.

2. Hamstring Curls:

  1. Lie flat on your stomach and bend your knee as much as possible.
  2. Hold for 5 seconds, then return to the starting position.
  3. Repeat 10-15 times.

3. Heel and Calf Raises:

  1. Stand tall with your feet flat on the floor.
  2. Rise onto your toes, hold for a few seconds, then lower back down.
  3. Perform 10-15 reps.

4. Leg Press (If cleared by your physiotherapist):

  1. Using a leg press machine, push with your legs to strengthen the quadriceps, hamstrings, and calves.
  2. Start with light weight and gradually increase as you gain strength.

5. Single-Leg Stance:

  1. Stand on one leg and maintain balance for 30 seconds to 1 minute.
  2. Add progression by performing the exercise with eyes closed or on an unstable surface (e.g., balance pad).

When to Consider Surgery for ACL Tear?

While physiotherapy is an effective treatment for many ACL injuries, some individuals may require surgery, particularly if:

  1. The tear is severe or complete.
  2. The injury is accompanied by damage to other knee structures, like the meniscus or cartilage.
  3. You are an athlete or engage in high-impact sports requiring maximum knee stability.

A surgeon or orthopedic specialist will help determine the best course of action based on the severity of the injury, your activity level, and overall health.

Conclusion

Physiotherapy is an essential component of ACL tear rehabilitation. It not only helps alleviate pain and restore knee function but also strengthens the muscles surrounding the knee and improves balance and coordination, ultimately reducing the risk of future injuries. Whether you're recovering from an ACL injury conservatively or preparing for surgery, working with a skilled physiotherapist can ensure that you regain full functionality and return to your activities with confidence.

If you’re struggling with an ACL injury, it’s essential to consult with your healthcare provider to create a personalized physiotherapy plan tailored to your needs. Your road to recovery starts with the right treatment approach!

Read More
Physiotherapy for Knee Pain: A Proven Solution for Relief and Recovery

Physiotherapy for Knee Pain: A Proven Solution for Relief and Recovery

Knee pain is one of the most common complaints that affect people of all ages, from active athletes to individuals with sedentary lifestyles. Whether it’s caused by injury, overuse, aging, or underlying conditions such as arthritis, knee pain can significantly affect your daily life. The good news is that physiotherapy is an effective treatment option to manage and alleviate knee pain. In this blog, we will explore how physiotherapy can help relieve knee pain, the techniques used, and how a customized rehabilitation plan can get you back on your feet.

What Causes Knee Pain?

Knee pain can stem from a variety of factors, including:

  1. Injuries: Sprains, strains, ACL tears, meniscus tears, or fractures.
  2. Osteoarthritis: Degeneration of cartilage leading to pain, swelling, and stiffness.
  3. Patellofemoral Pain Syndrome (Runner’s Knee): Pain around the kneecap often caused by overuse.
  4. Bursitis: Inflammation of the bursae (fluid-filled sacs) around the knee joint.
  5. Tendinitis: Inflammation of the tendons, often caused by repetitive movement or overuse.
  6. Gout or Infection: Less common but can lead to significant pain and swelling.

Whether your knee pain is from an acute injury or a chronic condition, physiotherapy offers a non-invasive and effective solution to treat and manage the pain.

How Physiotherapy Helps with Knee Pain

Physiotherapy for knee pain focuses on restoring function, reducing pain, and improving strength and mobility. A skilled physiotherapist will create a personalized treatment plan tailored to your specific condition. Here’s how physiotherapy can benefit you:

1. Pain Management and Inflammation Control

Physiotherapists use a variety of techniques to reduce pain and inflammation:

  1. Ice and Heat Therapy: Ice packs reduce swelling and numb the pain, while heat therapy increases blood flow and helps relax tight muscles.
  2. Ultrasound Therapy: Deep tissue massage with ultrasound waves promotes healing and reduces pain and inflammation.
  3. TENS (Transcutaneous Electrical Nerve Stimulation): A technique that uses electrical impulses to block pain signals, providing temporary relief.

2. Restoring Range of Motion

Knee pain can lead to stiffness and a limited range of motion. Physiotherapy focuses on stretching and joint mobilization exercises to improve flexibility and restore normal movement. Some exercises may include:

  1. Knee Flexion and Extension Exercises: These help restore your knee’s ability to bend and straighten fully.
  2. Joint Mobilization: Manual techniques to improve movement in the knee joint.

3. Strengthening Muscles Around the Knee

Weak muscles around the knee can lead to further instability and increased pain. Strengthening these muscles, especially the quadriceps, hamstrings, and calves, is critical to knee rehabilitation. A physiotherapist will guide you through exercises that target these muscle groups, including:

  1. Quadriceps Strengthening: Leg lifts, squats, and lunges to target the quadriceps muscles that stabilize the knee.
  2. Hamstring Curls: To strengthen the back of the thigh and support knee function.
  3. Calf Raises: To support the muscles that stabilize the lower leg and knee joint.

4. Improving Balance and Proprioception

Proprioception is the body’s ability to sense where it is in space, which is crucial for maintaining balance and preventing falls. A physiotherapist may incorporate balance exercises into your treatment plan, such as:

  1. Single-Leg Stands: Standing on one leg while maintaining balance.
  2. Balance Boards or Pads: To challenge stability and improve coordination.

5. Correcting Posture and Movement Patterns

Poor posture and improper movement patterns can place unnecessary stress on the knees, exacerbating pain. A physiotherapist will assess your walking, standing, and sitting habits, and guide you to adopt proper biomechanics. This might include:

  1. Postural Education: Teaching you how to sit, stand, and move without placing excess strain on your knees.
  2. Gait Training: Adjusting your walking technique to distribute weight more evenly and reduce knee strain.

6. Education and Self-Management Strategies

A physiotherapist will provide valuable information on managing knee pain at home, such as:

  1. Lifestyle Modifications: Tips on avoiding movements that exacerbate pain (e.g., avoiding prolonged sitting or squatting).
  2. Ergonomics: Recommendations for your workstation, home environment, or exercise routine to prevent strain on your knees.
  3. Activity Modification: Guidance on low-impact exercises like swimming or cycling, which are gentler on the knees.

Key Physiotherapy Techniques for Knee Pain Relief

Here are some specific physiotherapy techniques commonly used for knee pain:

  1. Manual Therapy: A hands-on approach that involves joint manipulation and soft tissue massage to reduce pain and improve knee mobility.
  2. Strengthening Exercises: Progressive exercises designed to build muscle strength around the knee joint, which helps stabilize the knee and relieve stress on the injured area.
  3. Stretching and Flexibility Exercises: Techniques that improve flexibility in the muscles and tendons surrounding the knee, increasing mobility and reducing stiffness.
  4. Aquatic Therapy: Exercises performed in water, which reduce the impact on the knee joint while allowing you to strengthen muscles and improve range of motion.
  5. Dry Needling: A technique used to target trigger points in the muscles and relieve tension, which may help alleviate knee pain caused by muscle tightness.
  6. Bracing and Taping: Physiotherapists may use knee braces or kinesiology tape to provide additional support to the knee joint, especially during physical activity or rehabilitation exercises.

A Typical Physiotherapy Treatment Plan for Knee Pain

A typical treatment plan for knee pain is divided into several phases:

Phase 1: Acute Pain and Inflammation (Week 1-2)

  1. Focus on pain reduction and swelling management using ice, heat, ultrasound, and TENS therapy.
  2. Gentle range-of-motion exercises to prevent stiffness.

Phase 2: Regaining Range of Motion (Week 2-4)

  1. Progressive stretching and joint mobilization exercises to improve knee flexibility.
  2. Begin light strengthening exercises to activate key muscle groups.

Phase 3: Strengthening and Stabilizing (Week 4-6)

  1. Increased emphasis on strengthening exercises to build muscle support around the knee joint.
  2. Functional exercises that mimic daily activities, such as squatting and walking.

Phase 4: Return to Activity (Week 6+)

  1. Gradual return to normal activities with a focus on safe movement patterns.
  2. Sports-specific exercises or exercises tailored to your daily activities.
  3. Ongoing education on maintaining knee health and preventing future injuries.

When to Seek Physiotherapy for Knee Pain

If you're experiencing knee pain, it’s important to seek professional help before the issue becomes chronic or leads to further injury. You should consider physiotherapy if:

  1. You have ongoing pain that doesn’t improve with rest.
  2. You’re experiencing difficulty walking, climbing stairs, or performing daily activities.
  3. Your knee is swollen, stiff, or unstable.
  4. You’ve been diagnosed with knee conditions like osteoarthritis or tendinitis.

Conclusion

Knee pain can be debilitating, but physiotherapy offers a non-invasive, effective approach to managing pain, restoring function, and improving the quality of life. Whether you’ve suffered an injury, have a chronic condition, or are simply dealing with age-related wear and tear, physiotherapy can help reduce pain, strengthen muscles, and get you back to doing what you love.

If knee pain is affecting your daily life, don’t wait—contact a qualified physiotherapist to get started on your personalized rehabilitation plan today. With the right approach, you can experience lasting relief and a return to normal function.

Read More
Understanding Frozen Shoulder and Rotator Cuff Injuries: Causes, Symptoms, and Physiotherapy Treatment

Understanding Frozen Shoulder and Rotator Cuff Injuries: Causes, Symptoms, and Physiotherapy Treatment

Shoulder injuries, especially those involving the frozen shoulder or rotator cuff, are common issues that can lead to severe pain, restricted movement, and difficulty with everyday activities. These conditions can be debilitating, affecting everything from reaching overhead to performing simple daily tasks. Fortunately, with the right approach to treatment, including physiotherapy, both frozen shoulder and rotator cuff injuries can be managed effectively. In this blog, we will explore the causes, symptoms, and physiotherapy treatments available for these two common shoulder conditions.

What is Frozen Shoulder?

Frozen shoulder, medically known as adhesive capsulitis, is a condition characterized by stiffness and pain in the shoulder joint. It typically progresses in three stages, leading to decreased mobility and intense discomfort. The exact cause of frozen shoulder is still not fully understood, but it often occurs after an injury, surgery, or inactivity (e.g., prolonged immobilization of the shoulder).

Frozen Shoulder Symptoms

  1. Pain: This usually begins as a dull or aching pain in the shoulder, especially at night.
  2. Stiffness: Gradual loss of range of motion, making it difficult to lift the arm or move the shoulder freely.
  3. Restricted Movement: Difficulty performing overhead activities or even simple tasks like brushing your hair or reaching for objects.
  4. Stages of Frozen Shoulder:
  5. Freezing Stage (Painful Stage): The shoulder becomes painful and stiff, making it hard to move.
  6. Frozen Stage (Stiff Stage): Pain may decrease, but stiffness persists, leading to limited shoulder motion.
  7. Thawing Stage: Gradual improvement in range of motion as the shoulder starts to loosen up.

What is a Rotator Cuff Injury?

The rotator cuff is a group of four muscles and tendons that stabilize the shoulder and allow for a wide range of motion. A rotator cuff injury refers to any damage to these muscles or tendons, such as a tear, strain, or tendinitis. Rotator cuff injuries are commonly seen in athletes who perform overhead motions (e.g., swimming, tennis, weightlifting), but they can also occur due to aging, repetitive movements, or accidents.

Rotator Cuff Injury Symptoms

  1. Pain: This can range from mild discomfort to severe, sharp pain, especially when lifting or rotating the arm.
  2. Weakness: Difficulty lifting or rotating the arm, especially when the arm is held out to the side or above shoulder level.
  3. Limited Range of Motion: Pain and weakness may prevent the shoulder from moving fully.
  4. Pain at Night: This is particularly common if the rotator cuff is inflamed or torn.

Causes of Frozen Shoulder and Rotator Cuff Injuries

Frozen Shoulder

While the exact cause is unclear, frozen shoulder is often triggered by:

  1. Prolonged inactivity: After surgery, injury, or immobilization (e.g., using a sling), the shoulder joint may become stiff and frozen.
  2. Diabetes: People with diabetes are more likely to develop frozen shoulder.
  3. Inflammatory conditions: Conditions like thyroid disorders, cardiovascular diseases, and Parkinson's disease have been linked to frozen shoulder.

Rotator Cuff Injuries

The primary causes of rotator cuff injuries include:

  1. Repetitive motion: Sports or activities that involve overhead movements put repetitive stress on the shoulder muscles, leading to wear and tear.
  2. Aging: As we age, the tendons in the rotator cuff become less flexible and more prone to tears or injuries.
  3. Trauma: Sudden impacts, falls, or accidents can cause acute rotator cuff injuries.
  4. Posture: Poor posture can strain the rotator cuff muscles and lead to inflammation and injury over time.

Diagnosing Frozen Shoulder and Rotator Cuff Injuries

Both conditions are diagnosed through:

  1. Medical History and Physical Examination: A physiotherapist or doctor will assess the shoulder's range of motion, strength, and pain response to various movements.
  2. Imaging: In some cases, imaging tests like X-rays, MRI, or ultrasound may be used to rule out other issues (e.g., bone spurs, fractures) and confirm a diagnosis.

Physiotherapy Treatment for Frozen Shoulder

Physiotherapy plays a vital role in the treatment of frozen shoulder, especially in the early stages. The goal of treatment is to reduce pain, improve flexibility, and restore mobility.

1. Pain Management

  1. Ice Therapy: Applying ice to the shoulder can help reduce inflammation and alleviate pain, especially during the freezing stage.
  2. Heat Therapy: Heat can be used to relax the muscles and increase blood flow, aiding in the healing process during the thawing stage.
  3. TENS (Transcutaneous Electrical Nerve Stimulation): This can be used to block pain signals and improve pain tolerance.

2. Stretching and Range-of-Motion Exercises

  1. Gentle Stretching: Physiotherapists will guide patients through gentle stretches to improve shoulder mobility and reduce stiffness.
  2. Active and Passive Movements: These exercises help improve both active and passive range of motion, starting with less intense movements and progressing as the shoulder improves.
  3. Pendulum Exercises: A simple exercise where the arm hangs loosely and swings gently to promote movement and reduce stiffness.

3. Strengthening Exercises

Once pain decreases and mobility improves, physiotherapists will focus on strengthening the muscles around the shoulder. Stronger muscles will help stabilize the joint and prevent future injuries. Exercises may include:

  1. Shoulder Isometrics: Holding the arm in various positions to activate shoulder muscles without excessive movement.
  2. Resistance Band Exercises: These help strengthen the rotator cuff muscles, improving shoulder stability.

4. Joint Mobilization

Manual techniques, such as joint mobilizations, can be used by physiotherapists to gently move the shoulder joint and improve mobility. These techniques can help loosen tight areas within the shoulder capsule.

Physiotherapy Treatment for Rotator Cuff Injuries

Rotator cuff injuries often require a combination of rest, rehabilitation exercises, and strengthening. Physiotherapy helps reduce pain, restore function, and prevent further injury.

1. Pain Reduction

  1. Ice Therapy: To reduce inflammation and manage pain, especially during the acute phase of the injury.
  2. Heat Therapy: Heat may be used to relax muscles and improve blood circulation.
  3. Anti-inflammatory Techniques: Ultrasound therapy or TENS may be used to reduce inflammation and promote healing.

2. Range-of-Motion Exercises

  1. Passive Range-of-Motion Exercises: These are initially performed with assistance to avoid further strain on the injured rotator cuff.
  2. Active Range-of-Motion Exercises: Gradually, patients can begin performing active exercises to increase shoulder flexibility.

3. Strengthening Exercises

Strengthening the rotator cuff muscles and the surrounding shoulder muscles is essential for preventing future injuries and restoring full function. These exercises may include:

  1. Internal and External Rotations: Using resistance bands or light weights to strengthen the rotator cuff muscles.
  2. Scapular Stabilization Exercises: Exercises that strengthen the shoulder blade muscles to improve overall shoulder stability.
  3. Overhead Presses: Once healing progresses, strengthening the deltoid and upper arm muscles will further improve shoulder function.

4. Postural Correction

Good posture is crucial in rotator cuff rehabilitation. Physiotherapists will often work on correcting postural issues, especially for those with poor posture due to repetitive activities or sports. This can help reduce strain on the shoulder and prevent further injury.

When to Seek Surgery?

In most cases, physiotherapy can help manage both frozen shoulder and rotator cuff injuries. However, if conservative treatments do not provide relief or if the injury is severe (e.g., full-thickness rotator cuff tear), surgery may be required. Surgical options may include:

  1. Rotator Cuff Repair Surgery: If the tear is large or does not heal with physiotherapy, surgery may be necessary to reattach the tendon to the bone.
  2. Shoulder Arthroscopy: Minimally invasive surgery for conditions like impingement or labral tears.
  3. Shoulder Replacement: In severe cases of frozen shoulder, shoulder replacement surgery may be considered.

Conclusion

Frozen shoulder and rotator cuff injuries are common shoulder conditions that can significantly impact daily life. However, with the right physiotherapy treatment, many people can regain full function and reduce pain. Physiotherapy plays a key role in both conditions, focusing on improving mobility, strength, and overall shoulder health. Early intervention, combined with a targeted rehabilitation plan, can help prevent further complications and support a speedy recovery.

Read More
Fit-At-Home Exercises to Stay Strong and Healthy

Fit-At-Home Exercises to Stay Strong and Healthy

Staying fit doesn’t require a gym membership or fancy equipment. With just a little space and your own body weight, you can achieve a full-body workout from the comfort of your home. Whether you're new to exercising or a seasoned fitness enthusiast, at-home workouts offer convenience, flexibility, and a great way to stay healthy. In this blog, we’ll explore four effective fit-at-home exercises that target multiple muscle groups, boost metabolism, and improve overall fitness.

1. Bodyweight Squats: The Ultimate Lower-Body Exercise

Benefits:

Squats are one of the best exercises to tone your legs and glutes, strengthen your core, and improve overall lower-body mobility. They engage your quads, hamstrings, glutes, and calves while also challenging your core for stability.

How to do it:

  1. Stand with your feet shoulder-width apart, toes pointing forward or slightly outward.
  2. Keep your chest up and your back straight, engaging your core.
  3. Slowly lower your hips back and down, as if you're sitting into a chair.
  4. Keep your knees behind your toes and ensure they don’t cave inward.
  5. Lower down until your thighs are parallel to the ground (or as low as you can comfortably go).
  6. Push through your heels to return to the standing position.

Tips:

  1. Keep your weight in your heels and try to avoid pushing your knees forward past your toes.
  2. For added intensity, try holding a weight (e.g., a kettlebell or dumbbell) or do jump squats.

Reps: 3 sets of 12-15 squats.

2. Push-Ups: Build Upper-Body Strength

Benefits:

Push-ups are a classic exercise that works your chest, shoulders, triceps, and core. They also help improve posture, promote upper-body endurance, and increase functional strength.

How to do it:

  1. Start in a high plank position with your hands slightly wider than shoulder-width apart and your feet hip-width apart.
  2. Engage your core and keep your body in a straight line from head to heels.
  3. Lower your body toward the floor by bending your elbows, keeping them at about a 45-degree angle from your body.
  4. Once your chest is just above the floor, push yourself back up to the starting position.

Modifications:

  1. If a standard push-up is too challenging, perform them on your knees or against a wall to reduce the intensity.
  2. For added difficulty, elevate your feet on a sturdy surface (like a chair) or add a clap between reps.

Reps: 3 sets of 10-15 push-ups.

3. Planks: Strengthen Your Core

Benefits:

Planks are one of the most effective exercises for strengthening your entire core, including your abs, back, and glutes. They also help improve stability, posture, and endurance.

How to do it:

  1. Start by lying face down on the floor, then lift your body onto your forearms and toes.
  2. Keep your elbows aligned directly under your shoulders and your body in a straight line from head to heels.
  3. Engage your core, squeeze your glutes, and avoid letting your lower back sag or your hips rise.
  4. Hold the position for as long as you can while maintaining proper form.

Modifications:

  1. To make it easier, perform a forearm plank or knee plank.
  2. To make it harder, try side planks, plank with leg raises, or extend the time you hold the position.

Time: 3 sets, holding each plank for 20-60 seconds.

4. Lunges: Full Leg and Glute Sculpting

Benefits:

Lunges are an excellent exercise for targeting the legs and glutes. They help build strength, improve balance, and engage your core. Plus, they’re great for functional movement and stability.

How to do it:

  1. Start by standing tall with your feet hip-width apart and hands on your hips or at your sides.
  2. Take a big step forward with your right foot, lowering your hips until both knees are bent at 90-degree angles.
  3. Your back knee should hover just above the floor, and your front knee should be directly over your ankle.
  4. Push off the right foot to return to the starting position, then repeat on the left side.

Tips:

  1. Keep your chest upright and avoid letting your front knee extend past your toes.
  2. For added intensity, hold a pair of dumbbells or water bottles in each hand.
  3. If you want a greater challenge, try jumping lunges (also called split jumps).

Reps: 3 sets of 12-15 lunges per leg.

Putting It All Together: A Full-Body Fit-At-Home Workout

You can combine these exercises into a full-body workout routine for a balanced and effective session. Here’s a simple workout you can do at home:

  1. Bodyweight Squats – 3 sets of 12-15 reps
  2. Push-Ups – 3 sets of 10-15 reps
  3. Planks – 3 sets, hold for 20-60 seconds
  4. Lunges – 3 sets of 12-15 reps per leg

Tips for Success:

  1. Rest: Allow 30-60 seconds of rest between each set to recover.
  2. Consistency: Aim to perform this workout 3-4 times a week for the best results.
  3. Progression: As you get stronger, increase the intensity by adding weights or doing more reps/time.
  4. Warm-Up and Cool-Down: Always begin with a 5-10 minute warm-up (like light jogging or jumping jacks) and finish with a cool-down (stretching and deep breathing) to avoid injury.

Conclusion

Working out at home doesn't have to be complicated or require expensive equipment. These four fit-at-home exercises—bodyweight squats, push-ups, planks, and lunges—are simple yet effective ways to target multiple muscle groups, build strength, and stay healthy. Whether you're looking to build muscle, burn fat, or just maintain overall fitness, these exercises are great additions to your at-home workout routine.

Read More
Safe and Effective Pregnancy Exercises for a Healthy Mom and Baby

Safe and Effective Pregnancy Exercises for a Healthy Mom and Baby

Pregnancy is an exciting time, but it can also bring physical challenges such as back pain, swelling, fatigue, and mood swings. While it’s essential to prioritize rest, staying active during pregnancy can provide a variety of health benefits for both mom and baby. Regular, low-impact exercise can improve circulation, reduce discomfort, enhance mood, and prepare your body for labor. In this blog, we’ll explore safe and effective pregnancy exercises that promote a healthy and strong body throughout your pregnancy journey.

Benefits of Exercise During Pregnancy

Before diving into specific exercises, let’s take a look at the many benefits of staying active during pregnancy:

  1. Improves Mood: Exercise helps release endorphins, which are natural mood boosters, reducing feelings of anxiety and stress.
  2. Boosts Energy: Regular physical activity can help combat fatigue by improving blood circulation and oxygen flow to the body.
  3. Reduces Pregnancy Discomfort: Exercises that focus on strengthening and stretching muscles can help reduce common pregnancy discomforts, like back pain and swelling.
  4. Improves Posture and Balance: As your belly grows, your center of gravity shifts, which can affect posture and balance. Pregnancy exercises help maintain better posture and stability.
  5. Prepares for Labor: Many exercises strengthen the muscles needed during childbirth and improve endurance, making the labor process smoother.
  6. Promotes Faster Recovery: Staying active during pregnancy can aid in a quicker postpartum recovery by keeping your muscles and joints flexible and strong.

General Guidelines for Safe Pregnancy Exercise

Before starting any exercise routine, consult your healthcare provider to ensure you’re clear to exercise based on your health and pregnancy status. Here are some general guidelines to follow:

  1. Stay Hydrated: Drink plenty of water before, during, and after your workout.
  2. Avoid Overheating: Stay cool and avoid exercising in hot and humid conditions.
  3. Avoid High-Risk Movements: Activities with a high risk of falling or injury (e.g., contact sports, skiing, and horseback riding) should be avoided.
  4. Listen to Your Body: If you feel dizzy, short of breath, or experience any pain or discomfort, stop immediately and consult your doctor.
  5. Modify as Needed: As your pregnancy progresses, modify exercises to suit your changing body and avoid excessive strain on the joints and ligaments.

5 Safe and Effective Pregnancy Exercises

Here are five exercises that are safe, low-impact, and can help you stay strong, flexible, and energized throughout your pregnancy.

1. Pelvic Tilts: Strengthen Core and Relieve Back Pain

Benefits: Pelvic tilts help strengthen your lower back, improve posture, and reduce back pain, which is common during pregnancy. They also engage the core muscles, which are important for supporting your growing belly.

How to do it:

  1. Lie on your back with your knees bent and feet flat on the floor.
  2. Place your hands on your belly or hips for support.
  3. Tighten your abdominal muscles and gently tilt your pelvis upward, pushing your lower back into the floor.
  4. Hold for a few seconds, then release back to the starting position.
  5. Repeat 10-15 times.

Modification: As your pregnancy progresses, perform this exercise while standing or on all fours (hands and knees) for better comfort.

2. Squats: Strengthen Legs, Glutes, and Pelvic Floor

Benefits: Squats are great for strengthening the legs, glutes, and pelvic floor muscles, which are essential for labor and recovery. They also improve balance and posture by targeting the lower body.

How to do it:

  1. Stand with your feet hip-width apart, toes pointing slightly outward.
  2. Lower your body into a squat by bending your knees and pushing your hips back (as if you are sitting in a chair).
  3. Keep your chest lifted and knees behind your toes.
  4. Push through your heels to return to standing.
  5. Perform 2-3 sets of 10-15 squats.

Modification: If squats become difficult, try using a chair for support by holding onto the back for balance.

3. Cat-Cow Stretch: Improve Flexibility and Ease Discomfort

Benefits: The cat-cow stretch is a gentle movement that helps relieve back tension and improves flexibility in the spine, neck, and shoulders. It also helps with pelvic alignment and engages the core.

How to do it:

  1. Start on your hands and knees in a tabletop position, wrists aligned with shoulders and knees aligned with hips.
  2. On an inhale, drop your belly towards the floor and lift your head and tailbone, arching your back (cow pose).
  3. On an exhale, round your back upwards, tucking your chin toward your chest and pulling your belly button toward your spine (cat pose).
  4. Repeat the flow 10-12 times, moving with your breath.

Modification: Perform the stretch slowly and gently to avoid overstretching. If you have any discomfort, adjust the movement accordingly.

4. Standing Side Leg Raises: Strengthen Hips and Glutes

Benefits: Side leg raises help strengthen the hips, glutes, and lower back, which are important for maintaining balance as your belly grows. This exercise also targets the pelvic muscles, which support the baby.

How to do it:

  1. Stand with your feet hip-width apart, holding onto a chair or wall for balance.
  2. Slowly lift your right leg out to the side, keeping it straight and avoiding tilting your torso.
  3. Hold for a few seconds, then lower the leg back to the starting position.
  4. Repeat 10-15 times on each leg.

Modification: If balancing is difficult, use a wall or sturdy chair for support. For an added challenge, you can place a resistance band around your ankles.

5. Prenatal Yoga: Improve Flexibility, Relax, and Reduce Stress

Benefits: Prenatal yoga is an excellent way to relax, reduce stress, and improve flexibility. It also helps you build strength and endurance, which can be beneficial during labor and delivery. Many prenatal yoga poses target the hips, back, and pelvic floor.

How to do it:

  1. Child’s Pose: Kneel on the floor, sit your hips back toward your heels, and lower your forehead to the floor. This pose stretches the back and helps relax the mind.
  2. Bridge Pose: Lie on your back with your knees bent and feet flat on the floor. Lift your hips towards the ceiling while pressing through your feet and engaging your glutes.
  3. Butterfly Pose: Sit with your feet together and your knees out to the sides. Gently press your knees toward the floor, stretching your inner thighs and hips.

Modification: As your pregnancy progresses, avoid poses that require lying flat on your back for extended periods of time, as this can compress the vena cava (a major blood vessel).

Tips for Staying Safe While Exercising During Pregnancy

  1. Avoid Overexertion: Focus on maintaining a moderate level of exercise intensity, and avoid pushing yourself too hard.
  2. Wear Comfortable Clothing: Choose loose, breathable clothing and supportive footwear to make your workouts more comfortable.
  3. Listen to Your Body: If you experience any pain, dizziness, shortness of breath, or other concerning symptoms, stop exercising and consult your healthcare provider.
  4. Focus on Breathing: Deep, controlled breathing will help you stay relaxed and reduce tension during exercise.

Conclusion

Exercising during pregnancy is not only safe, but it can also provide numerous benefits for both you and your baby. The key is to choose exercises that are gentle, low-impact, and designed to improve strength, flexibility, and overall well-being. Incorporating these safe and effective exercises—like pelvic tilts, squats, yoga, and leg raises—into your daily routine can help alleviate discomfort, reduce stress, and prepare you for labor. Always check with your doctor before beginning any exercise routine to ensure it's right for you and your baby.

Read More